Saturday, December 29, 2012

How to identify if user is in a particular permission group using Web Service

Some days back I was faced with a task of changing the behavior of the list new /Edit form based on the user presence in a particular permission group.

Problem Statement: If the user was present in “Members” group I need to hide some fields and if he was present in the “Owners” Group, I need to show all those fields.

Solution: By calling the GetGroupCollectionFromUser operation of the Users and Groups Web Service, you can determine whether your user is in the group. I got this from Marc post.

The only small issue fixed in that post code was that it worked not on every browser, hence I need to modify it a little to support cross browser. I used responseText instead of responseXML.

  1. First we need to add JavaScript directives to the page, I have provided the CDN link which you can directly use or can download the libraries to use it.
  2. 


  3. Then include the below script to check the current logged user’s group
  4. 


    These scripts can be used on CEWP to achieve the desired result.

Sunday, October 7, 2012

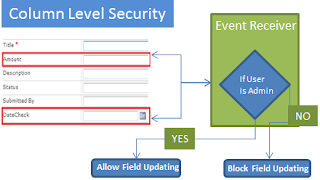
Event Receiver and column level security in SharePoint 2010

SharePoint doesn't support field/Column level security out of the box. So when we want to allow some fields to be filled up by only a particular group then we need to go for a custom development. As I found out there are some ways to do it,

1) Using InfoPath (I guess the best way)
2) Using Event Receiver (If you don’t have InfoPath, then the best way :)

I will be developing this with Event Receiver.

Understanding Event Receiver


An event receiver in Microsoft SharePoint Foundation 2010 is simply a method that is called when a triggering action occurs on a specified SharePoint object. Triggering events include actions such as adding, updating, deleting, moving, checking in, and checking out. SharePoint objects that listen for events—that is, event receiver hosts—include objects such as site collections, sites, lists, and workflows.—Microsoft Site Definition.

There can be various events like ItemAdding, ItemAdded, ItemUpdating, ItemUpdated,ItemDeleting, ItemDeleted. These events are broadly categorized into (before) synchronous and (after) asynchronous events. The method suffix such as “ing” (e.g. ItemAdding) and “ed” (e.g. ItemAdded) will tell you whether it gets invoked before or after the actual change is made.

Now there are three holders (beforeProperty, afterproperty, listitem) which carry the data during these events, hence it is very important to understand which event receiver will carry data in these holders and which not. The below table will clears this mist.


Creating Event Receiver through Visual Studio

Problem Statement: We have an "Expense Report" list in which there are two columns a) Amount  b) DateCheck . These two columns are required to be filled by only “My Test Owners” group users.
Let’s Start :
  1. Fire up Visual Studio 2010 and from the templates select “Event Receiver” for the new project under SharePoint 2010 and name the project as “HideFieldEventReceiver”

  2. The configuration wizard would ask you for the URL of the site against which you would like to create the Event Receiver, also choose deploy as farm solution. Then choose the Event Receiver settings as below.

  3. Visual Studio will create an EventReceiver.cs and Elements.XML, the EventReceiver.cs will have methods for both ItemAdding and Item Updating events, and Elements.XML will help in connecting to the List and the events.
    As in Elements.Xml the Event is connected to all Custom List, hence we need to modify it as below to make it connect to our specific List called “Expense Report”. Remove ListTemplateId to ListUrl.

  4. Now open the EventReceive.cs file and in the ItemAdding Event add the below code. This will run whenever a user is adding a new Item in List, which will check the permissions of the user and also identify if he is updating those restricted fields. We will be using the AfterProperties of the column to check if the fields are being updated.

  5.                 public override void ItemAdding(SPItemEventProperties properties)
            {
                base.ItemAdding(properties);
                if (properties.AfterProperties["Amount"].ToString() != string.Empty || 
                    properties.AfterProperties["DateCheck"].ToString() != string.Empty)
                {
                    using (SPWeb ob = properties.OpenWeb())
                    {
    
                        SPGroup group = ob.Groups["My Test Owners"];
                        if (!ob.IsCurrentUserMemberOfGroup(group.ID))
                        {
                            properties.Cancel = true;
                            properties.ErrorMessage = "You are not allowed to fill this";
                        }
                    }
                }
            }
            
  6. Now in the Item Updting Event add the below code. This is little complicated as we need to check if there is a change in the field value by comparing the ListItem property(before Value) and AfterProperty (afterValue) of the fields.

  7. public override void ItemUpdating(SPItemEventProperties properties)
            {
                base.ItemUpdating(properties);
                if ((properties.ListItem["Amount"]!=null && properties.ListItem["Amount"].ToString() != properties.AfterProperties["Amount"].ToString())
                    || (properties.ListItem["DateCheck"]!=null && 
                    DateTime.Parse(properties.ListItem["DateCheck"].ToString(), null, DateTimeStyles.AdjustToUniversal) != 
                    DateTime.Parse(properties.AfterProperties["DateCheck"].ToString(), null, DateTimeStyles.AdjustToUniversal)))
                {
                    using (SPWeb ob = properties.OpenWeb())
                    {
                        SPGroup group = ob.Groups["My Test Owners"];
                        if (!ob.IsCurrentUserMemberOfGroup(group.ID))
                        {
                            properties.Cancel = true;
                            properties.ErrorMessage = "You are not allowed to Edit the restricted Fields";
                        }
                    }
    
                }
                else if ((properties.ListItem["Amount"] == null && properties.AfterProperties["Amount"].ToString() != string.Empty)
                    || (properties.ListItem["DateCheck"]==null && properties.AfterProperties["DateCheck"] !=null && 
                    properties.AfterProperties["DateCheck"].ToString() != string.Empty))
                {
                    using (SPWeb ob = properties.OpenWeb())
                    {
                        SPGroup group = ob.Groups["My Test Owners"];
                        if (!ob.IsCurrentUserMemberOfGroup(group.ID))
                        {
                            properties.ErrorMessage = "You are not allowed to Edit the restricted Fields";
                            properties.Status = SPEventReceiverStatus.CancelWithError;
                            properties.Cancel = true;
                            
                        }
                    }
                }
            }
    
  8. Deploy the solution and test the code. I believe the code is very much self-explanatory where we test on the events if the fields have changed or not. If they are changed we check whether the current user is a member of the Owners group which is allowed for access. If they are not then we show the Error with Properties.ErrorMessage and we cancel the event


Tuesday, August 21, 2012

Create a SharePoint 2010 Custom List Definition without a Content Type

List Defition
A list definition defines a schema for a SharePoint list. It contains information on what views are being used, which columns and content types are being used, and other metadata information.
List Instance
A list instance is an instance of a specific SharePoint list definition. All of its data is stored in the relevant content database. Typically a list in SharePoint used by end users to enter and view data and it is based on a list definition.

Now after we understood what we gonna talk about, lets come to the topic. There are numerous examples of how to create list definitions that include a content type but what we will try to accomplish over here is to create a List Definition and List Template without content type.


  •  Fire up visual studio and create a new solution and select “List Definition” Project Template.
  •  Then in the “SharePoint Customization Wizard” provide the local site for debugging and select the radio option to deploy as a farm solution.
  •  Then provide the List Definition Name and select the type of List definition to use in the “List Definition Settings” wizard. Note: Also select the Checkbox “Add a List Instance for this List definition”.
  •  A new project with some files as show below will get created.
  •  Now change the details of Elements.XML file of both the List Instance and List Definition. “The Elements.xml contains general information like the Name, Description, Quick Launch, etc. Schema.xml, as the name implies, contains the actual metadata information about the List Definition/List Instance”

    Note: The Template Type of both the XML should be same. Change them to a number above 10000 and same.
  •  Now the Main Task. Open the schema.XML file and then add the fields that you want to add in your List. Like in this List I want to have 2 Fields.
    Ticket NoText
    Ticket TypeChoice

    So in the Fields section I added 2 Field


              Internal
              External


    Note: Create GUID(Highlighted in BOLD) at your own  system with the Visual Studio GUID Tool.
  •  Now to add the fields to the default instance (So that we can see the Fields when the instance is created) add the FieldRef tags in the View Field of the default View as shown below.
    
            
            main.xsl
            30


  •  Now the last thing and an important thing (Note as we are not using content type) hence we need to remove the content type portion of the Schema.XML file as this if present will not allow us to see the fields when we create a new form.
  •  Finally the code will look like the screenshot below.
  •  Now deploy the solution and woooooooooooh we have a List definition and List Template created for us as shown below.

Saturday, July 28, 2012

Icons are not displayed for Adobe PDF documents

Icons are not displayed for Adobe PDF documents

Last Wednesday one of the SharePoint users asked me that he is able to see icons for the Ms Word, Excel, and PowerPoint but not for the PDF document.

Yes, to my surprise it does not show this out of box, why? I guess because this is an adobe product and not Microsoft. But yes we can easily show the icon for the PDF file.


So I decided to put this on my blog.
  • When we upload a PDF document this is how it looks in the document Library (The same way it will appear in search results).
 
  •  Now to change this to a PDF icon. First download a PDF icon on size(16x16 Pixels, not mandatory but this will fit the size perfectly) You can choose your own icon or can take it from here:
  •  Copy the image file that you want to use for the icon to the following folder on the server, as appropriate for your version of SharePoint:

    SharePoint Server 2007- Drive: \Program Files\Common Files\Microsoft Shared\Web Server Extensions\12\Template\Image
    SharePoint Server 2010 - Drive: \Program Files\Common Files\Microsoft Shared\Web server extensions\14\Template\Images
  • Start Notepad, and then open the Docicon.xml file (Open the Notepad with Run as administrator permission). The Docicon.xml file is located in one of the following folders on the server:

    SharePoint Server 2007- Drive: \Program Files\Common Files\Microsoft Shared\Web server extensions\12\Template\Xml
    SharePoint Server 2010- Drive: \Program Files\Common Files\Microsoft Shared\Web server extensions\14\Template\Xml
  •    Add an entry for the .pdf extension.

As example above a new Mapping line has been added to the file. The value attribute above should be the PDF icon you copied in the images folder.
  • Now do an IISReset.

     And yes Hurray. The PDF icon is appearing………………………

Saturday, July 7, 2012

Full and Incremental Content Deployment in SharePoint 2010


While working with content deployment I came to know that we can do the full and incremental deployment but I was unable to find the option to do the same through central administration in SharePoint 2010. I came to know there was an option to do the same in central admin of SharePoint 2007.


Then I searched and got hold of an old screen from 2007 where I saw the option to do the same as shown below(LEFT IMAGE).The same when I did from the central admin of SharePoint 2010 I did not find any option(RIGHT IMAGE).

SharePoint 2007 Content Deployment

SharePoint 2010 Content Deployment


These option screen shown above are available when u “create a new Job” as show in the screen below


So how do we create a specific Job of type Incremental or Full? After doing surfing I found out that it can be done using PowerShell. Yes we can create Jobs with using PowerShell rather than the step show in figure 2(Above). Note this script should be run after you have already created the content deployment Path as in my case “Local Deploy”. 

New-SPContentDeploymentJob -Name " Local Deploy - Incremental" -SPContentDeploymentPath 
"Local Deploy" -IncrementalEnabled:$true

Now if we create a job through UI in central admin by default it will create Incremental Only. Yes and how do we find this out?
To do that, run Get-SPContentDeploymentJob "Local Deploy - Incremental". You should notice the following line in your output:
 

So how do we create a Job with “Full Content Deployment”

New-SPContentDeploymentJob -Name " Local Deploy - Full" -SPContentDeploymentPath 
"Local Deploy" -IncrementalEnabled:$false


Reference Take by : http://sharepointlearningcurve.blogspot.sg/2010/05/sp2010-content-deployment-jobs-missing.html

Sunday, June 17, 2012

Disk Size Report of all SharePoint Databases using PowerShell into Mailbox


As an administrator I always use to find the database size of all the SharePoint DB. Which I use to do with the PowerShell script, but lately I got pissed off doing this same activity everyday so I decided finally, write a PowerShell script and using a windows scheduler automate this. So now I will get all these details on my mail every morning when I come to office.


So what the below script do………………

The script first section (1) is used to get information about the mail exchange. 

The script second section (2) is, for-each loop which gets content database of all the web application. This then writes this information on to a file.

The script third Section (3) is, for-each loop which get all the SharePoint database size details which is also appended to the file.

Finally the fourth section (4) sends this information on a mail as an attachment.
The result of this code will be:

So the full code for download is :
#Get SharePoint Content database sizes 
Add-PSSnapin Microsoft.SharePoint.PowerShell -ErrorAction SilentlyContinue 
$date = Get-Date -Format "dd-mm-yyyy"
 
#Variables that you can change to fit your environment 
$TXTFile = "C:\ContentDatabase_$date.txt" 
$SMTPServer = "yourmailserver" 
$emailFrom = "SharePointReports@company.com" 
$emailTo = "youradmin@company.com" 
$subject = "Content Database size reports" 
$emailBody = "Daily/Weekly/Monthly report on Content databases"
 
$webapps = Get-SPWebApplication 
foreach($webapp in $webapps) 
{ 
    $ContentDatabases = $webapp.ContentDatabases 
    Add-Content -Path $TXTFile -Value "";
    Add-Content -Path $TXTFile -Value "----------------------------------------";
    Add-Content -Path $TXTFile -Value "Content databases for $($webapp.url)" 
    Add-Content -Path $TXTFile -Value "----------------------------------------";
    Add-Content -Path $TXTFile -Value "";
    foreach($ContentDatabase in $ContentDatabases) 
    { 
        $ContentDatabaseSize = [Math]::Round(($ContentDatabase.disksizerequired/1GB),2) 
        Add-Content -Path $TXTFile -Value "-     $($ContentDatabase.Name): $($ContentDatabaseSize)GB" 
    } 
} 
 
$databases = Get-SPDatabase
Add-Content -Path $TXTFile -Value "";
Add-Content -Path $TXTFile -Value "------------------------------------";
Add-Content -Path $TXTFile -Value "Content Size of Individual Databases";
Add-Content -Path $TXTFile -Value "------------------------------------";
Add-Content -Path $TXTFile -Value "";
foreach($database in $databases)
{
    Add-Content -Path $TXTFile -Value  " $($database.Name)  ---- $($database.disksizerequired/1024/1024) MB"    
}
 
if(!($SMTPServer) -OR !($emailFrom) -OR !($emailTo)) 
{ 
Write-Host "No e-mail being sent, if you do want to send an e-mail, please enter the values for 
            the following variables: $SMTPServer, $emailFrom and $emailTo." 
} 
else 
{ 
Send-MailMessage -SmtpServer $SMTPServer -From $emailFrom -To $emailTo -Subject $subject -Body $emailBody 
                 -Attachment $TXTFile 
}
Now How to use windows scheduler to automate this mailer on a daily basis you can refer to my earlier post http://sharepointdrive.blogspot.sg/2012/04/automating-sharepoint-site-backup-using_14.html

Please let me know if you face any difficulty in understanding or running this up. Also for more information on PowerShell go to http://sharepointrelated.com/

Sunday, April 29, 2012

Content Organizer in SharePoint 2010

The Content Organizer feature is a new routing feature that allows you to automatically route documents to different libraries and folders within a site collection. The document can be automatically routed to various document libraries based on the metadata.
Simply put it allows us to create rules that examine the content type and site columns of a document that was uploaded and move it someplace else.

It can also be used to do some housekeeping activities for the document Library for e.g. making sure that not any folder in a document Library contain more than specified no of records. If this happens it will create another folder and move the records to the new folder.

The requirement which came to me by a client was to develop a page where Legal department will upload the entire document and based on the metadata I will be pushing them in their respective document libraries. This will solve also the problem where sometime user don’t put the metadata on the document and just upload them. Hence now with this technique if they don’t provide the metadata the files will not reach the destination and will be just there sitting in the drop library.

How to Setup the Document Library

Now first we need to activate the Content Organizer Site Feature.


Once you activate this feature, there are three things get added to the site
-    A document Library called “DropOffLibrary”
-    Two new Links in Site Setting: Content Organizer Settings and Content Organizer Rules

The “Content Organizer Rules” link will take you to the rules List where you can add a new rule based on the content type and then you can specify condition based on the site column of the content type.

Lets see this with an Example.

Lets first see the high level diagram of what we are trying to achieve.
a)   We created a Content Type based on Document Content Type called “Support Request”.
       There we included new columns
                Support Name (Text Column)
                Support Type (Choice Column) whose option is IT Support and HR Support

b)    Then we created two documents Library based on the above content Type called HR Support and IT Support.

c)    Then we create Two Content Organizer Rule. Check out below how I have created “HR Document Rule”

d) In a similar way create a second rule called “IT Document Rule” where just change the condition to the one as shown below.

e) Now when we upload the document in a document library and from the Support Type dropdown column if we select HR Support the document will auto redirect to HR Support Library and we will get a similar message like the one shown below.


This is really a cool feature of SharePoint as we don’t require bothering where to push the document. If the rules are well placed just upload the document and it will reach its place.

Saturday, April 28, 2012

Creating hyperlink to display New List Form as Popup Dialog

Sharepoint 2010 Popup Dialogue
Someday back while designing a site I was required to have a New Form Link on the Home page and on clicking, it should show the popup Dialog window with the gray background.

Now first thing what came to my mind was to copy the same code from the “Add new Item” Link in List view. I was using IE to see the SharePoint site where I had developer Toolbar or in your case you case if you use Firefox can download firebug or just use view Source. So I Just pressed F12 on the page and the developer toolbar opened through which i coped the code of the link.


 After getting the link, remove the class and id attribute, so finally what I used is the snippet provided below. We can use the same code for any list. We just need to remove the List Id attribute with the correct List Id and the Site Name.

  <a onclick="javascript:NewItem2(event, &quot; http://Sitename /_layouts/listform.aspx?PageType=8&amp;ListId={88D74540-C80B-41BF-B325-EEAED6565385}&amp;RootFolder=&quot;);javascript:return false;" href="/_layouts/listform.aspx?PageType=8&amp;ListId={88D74540-C80B-41BF-B325-EEAED6565385}&amp;RootFolder=" target="_self">
Add New List Item
</a>

So the changes you need to make in the code before use are a)SiteName b)ListId.   In the below screenshot I have used with a content Editor web-part.   

I have added this screenshot showing how I added it to the CEWP and created the link

Saturday, April 14, 2012

Automating SharePoint site backup using PowerShell and windows Task Scheduler (Part 2)

Task Scheduler
In the Part 1 we created the script which will take the backup of a site collection and will store it in new folder based on the current date. This script has been saved as .ps1 (PowerShell script) file. Now we want this script to run every day at 10:00 PM when I am taking rest at home. This automation can be achieved easily by windows task scheduler.


How to use windows scheduler to automate the Backup on a daily basis

a) First load the Task Scheduler from Start >> All Programs >> Accessories >> System    Tool>> Task Scheduler. I am using the version which ships with windows server 2008 R2 edition, but the   concept should be same for other release.

b) To create a new Task, click Create Task from the right hand side “Actions Panel”.


c) This will open a Create Task window which will have first tab as General; here we need to provide the following basic information.

    General Tab

  1. Name of the Task like “SharePoint Backup”. A Description which is not mandatory
  2. Select the User Account under which the following task will run. Ensure that the user account has the necessary permissions to use the PowerShell on the SharePoint farm, permission to perform script action on the SharePoint.
  3. Select Run whether the user is logged in or not and tick the Do not store password checkbox. This is necessary because at the time of backup being taken you may not be logged in.
  4. Also enable the Run with highest privileges option. I would recommend testing the script from Task Scheduler with the option disabled and only enable if the script does not work without it.

d)  In the “Triggers Tab
  1. Click New and in the “New Trigger”
  2. In “Begin the Task” dropdown select “On a Schedule”
  3. Under Setting radio button choose “Daily” also choose the time at 10:00 PM (according to your wish).
  4. Don’t change advanced settings for now.


e)  In the “Actions Tab
  1. Click “New” in the Actions Tab.
  2. In the “New Action” window ensure the “action” is set to Start a program.
  3. Under settings Program/Script write “Powershell.exe”
  4. In Add Arguments (optional) type &'d:\Backup-SiteCollections.ps1'. Note: Wrapping the file path and name in single quotation marks allows you to specify spaces in the text.


You should now see your script in the Task Scheduler Library (if not, click Refresh in the right-hand panel). To test the script, highlight it in the console and click Run from the right-hand panel.


Automating SharePoint site backup using PowerShell and windows Task Scheduler (Part 1)

Powershell Backup

SharePoint administrators need to run regular backups using PowerShell, the STSADM tool or in Central Administration. But taking these backups on a daily basis can be a tedious process, hence either we can sit back and take backup, waiting for it to get over or we can go home and sleep on the couch, while the PowerShell and Task Scheduler take cares of the rest.

So in this series we will see
  1. How to write a PowerShell script to take Backup. (Part 1)
  2. How to use windows scheduler to automate the Backup on a daily basis. (Part 2)
Creating PowerShell script to take Backup

I have included the whole script first which i have then explained below in phases
Add-PsSnapin Microsoft.SharePoint.Powershell –ErrorAction SilentlyContinue
try
 {
    $today = (Get-Date -Format dd-MM-yyyy)
    $backupDirectory = "D:\Backup\DailySiteCollectionBackUp\$today"
  # Backup file Location
    $backupFile = "D:\Backup\DailySiteCollectionBackUp\$today\Backup.dat"
  # Log file location
    $logFile = "$backupDirectory\BackupLog.log"    
  # Address of the Site Collection to backup
    $Site = "http://a4md03082:10000/"
  
 # Location of the Backup Folder
    if (-not (Test-Path $backupDirectory)) 
    { 
      [IO.Directory]::CreateDirectory($backupDirectory)
      #New-Item $logPath -type $backupDirectory
    } 
 
 # Get backup start date and time 
    $backupStart = Get-Date -format "MM-dd-yyyy HH.mm.ss"
  
  # creates a log file  Start-Transcript -Path 
    Start-Transcript -Path $logFile
    
 # This will actually initiate the backup process. 
      Write-Host    
      Write-Host    
      Write-Host "Backup starting at $backupStart for $Site "    
      Write-Host "******************************************"
     Backup-SPSite -Identity $Site -Path $backupFile -Force
     $backupComplete = Get-Date -format "MM-dd-yyyy HH.mm.ss"
      Write-Host    
      Write-Host    
      Write-Host "Backup Completed at $backupComplete for $Site "    
      Write-Host "******************************************"
 
 Stop-Transcript 
 }
Catch
 {
  $ErrorMessage = $_.Exception.Message
  write "$today BackUp Failed   $ErrorMessage  ">>$logFile

 }

a) It will load the SharePoint snap IN
Including Powershell SnapIn
Including PowerShell SnapIN
b) It will create a folder with the current Date if not present.

Creating BackUp Folder
Note: Do change the path according to the place where you want to store the backup.

c) Then we will run the “Start Transcript/Stop-Transcript” block command. This will log all command that the user types and all output that appears on the console. Here we will require to pass the log file name. Between the “Start Transcript/Stop-Transcript” we will take the backup with the Backup-SPSite which will take the backup of the specified site

Create Backup Folder

Note: Start Transcript/Stop-Transcript command does not runs on the PowerShell ISE, this will run only on the console, which is the way we are going to do while running it from windows task scheduler.

d) Now after the whole script is created save it with a .ps1 extension.


Now in the Part 2 we will understand on how to run this script at a particular time of the day automatically.