Thursday, December 31, 2009

Custom Feature to Create a Content Type : Part 2

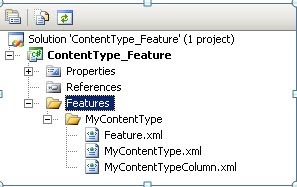
1) Create a new project (class Library) and then we will be creating a directory structure where we will create a directory called MyContentType which we will be deploying to the SharePoint feature folder. [Hence we are mimicking or shadowing the directory structure as is present in the SharePoint 12 hive].

2) Then we will create a XML file called feature.xml which contains a Feature element and it defines a feature and specifies the location of assemblies, files, dependencies, or properties that support the Feature.


< Feature xmlns="http://schemas.microsoft.com/sharepoint/"
Id="08A7F171-A9A2-4a9b-8CC2-E1686C6F35A2"
Title="My First Content Types"
Description=" Content Type of the Site"
Version="1.0.0.0" Scope="Site" Hidden="False" >
< elementmanifests >
< elementmanifest location="MyContentType.xml" >
< elementmanifest location="MyContentTypeColumn.xml" >
</elementmanifests >
</feature >


The feature element is the root element which contains the following attributes:
Id (a guid)
Title (Title of the feature)
description (description of the feature)
version (1.0.0.0, current feature version)
Scope (web, site, web application, farm) for content type we have to keep at Site.
xmlns (http://schemas.microsoft.com/sharepoint/, generally just the SharePoint namespace).

Notice the "ElementManifest" elements, these reference separate xml files "MyContentType.xml" and "MyContentTypeColumn.xml" which have yet to be created. These referenced xml files will contain field/column references that will be used in our content-type.

3) Create two xml files in your MyContentType folder, "MyContentType.xml" and “MyContentTypeColumn.xml". The "MyContentType.xml" file will define our content-types and contain references to the fields we create in our "MyContentTypeColumn.xml" file. The "MyContentTypeColumn.xml" file will define the fields and columns available for our content types.

4) First we will create a top level element called Elements inside which we will be adding the element called ContentType

< Elements xmlns=http://schemas.microsoft.com/sharepoint/ >
< ContentType ID="0x010100C568DB52D9D0A14D9B2FDCC96666E9F2007948130EC3DB064584E219954237AF390053F95050258F46abA22C328B17956A00"
Name="MyContent" Group="Custom Content Types"
Description="Custom Content type designed by Hemant"
Hidden="FALSE" >
< FieldRefs >
< FieldRef ID ="{7FE28353-9609-455d-B716-6E32E98084E5}" Name="MyHobby"/>
< FieldRef ID ="{B6014DB3-B39E-4ef2-8924-AF209F099BFD}" Name="MyBestMovie"/>
</FieldRefs>
</ContentType>
</Elements>


The "ContentType" element contains a few attributes:
Name (name of ContentType)
Group (group the ContentType belongs to)
Description (description of the ContentType)
Version(version of ContentType)

The "Id" attribute is a concatenation of a reference to its parent(s) content-type(s) and its own unique identifier. Our content-types inherit from the Publishing Content Types called Page who’s Id is underlined as shown above and then we add our own unique Id.

The "FieldRef" element, which is wrapped by the "FieldRefs" element, contains attributes referencing directly to the fields used within our content-type. The "ID" attributes references a unique ID of the Field that we wish and the name reference the name of that Field. The fields that we are referencing are all custom but could very well be an already existing field (you can find existing fields in the feature directory of the MOSS 12 hive).

5) Again we will be creating an XML file called Elements.xml named “MyContentTypeColumn.xml" In this file we define each of the fields referenced by our content-type in the previous xml file "MyContentType.xml”. The "Field" element contains a few attributes that we need to create our custom fields:

ID (guid, unique identifier for our field)
Name (the internal name of the field)
StaticName (the static name field)
SourceID (a reference to the sharepoint v3 namespace)
Group the group where the column will appear
DisplayName (the name that appears in our content-type)
Type (the data-type of the field i.e text, number, lookup)
Format (the format that thefield is presented)
Required (boolean, whether the field is required in our content-type)
Sealed (see schema at the end)

< Elements xmlns="
http://schemas.microsoft.com/sharepoint/" >
< Field ID ="{7FE28353-9609-455d-B716-6E32E98084E5}" Name="MyHobby"
Type="HTML" Title="MyHobby"
DisplayName="MyHobby" RichTextMode="FullHtml"
Group="MyCustomTypes" StaticName="MyHobby" RichText="TRUE" >
</Field >
<Field ID ="{B6014DB3-B39E-4ef2-8924-AF209F099BFD}" Name="MyBestMovie"
Type="HTML" Title="MyBestMovie"
DisplayName="MyBestMovie" RichTextMode="FullHtml"
Group="MyCustomTypes" StaticName="MyBestMovie" RichText="TRUE" >
</Field >
</Elements >


6) Now that it's ready, save all the files and copy it into the "Feature" directory of the 12 hive (12/Template/Features).Once copied, open up the "stsadm" command-line tool and enter the following commands:
stsadm -o installfeature -name CustomContentTypes –force

7) Now feature is waiting to be activated on the site of your choice, it can be activated from the command line or through the “Modify all Site Settings” in Site Action.

stsadm -o activatefeature -filename MyCustomContentTask Feature.xml -URL
http://localhost:82/

Monday, December 14, 2009

Features in wss3.0 - Part 1


Why Features came into existence?


When a site was created in wssv2, it was not easy to add new functionality to the site at the later date without writing some custom code to implement the changes. In addition, when some sort of functionality was reused across multiple site definitions or site template in wssv2, the functionality was literally copied to each site definition or template.Another benefit of using Features is in the use of site definition (ONET.xml) files. ONET.xml files provide Windows SharePoint Services with information about the navigation, lists, and document libraries that users can create. In the previous version of SharePoint, ONET.xml files have a tendency to get very large. With the advent of Features, the ONET.xml file shrinks because Features can now contain the information that was previously defined in the ONET.xml file.

Onet.xml
When you install Windows SharePoint Services 3.0, six Onet.xml files are placed within the setup directory, one in \Program Files\Common Files\Microsoft Shared\Web Server Extensions \12\TEMPLATE\GLOBAL\XML that applies globally to the deployment, and five in different folders within ...\TEMPLATE\SiteTemplates that apply to each of the five site definitions that ship with Windows SharePoint Services 3.0. They are Blog sites, the central administration site, Wiki sites, Meeting Workspace sites, and team SharePoint sites. Only the last two of these families contain more than one site definition configuration in Windows SharePoint Services 3.0. The global Onet.xml file defines list templates for hidden lists, list base types, a default definition configuration, and modules that apply globally to the deployment. The five Onet.xml files in the \SiteTemplates directory define navigational areas, list templates, document templates, configurations, modules, components, and server e-mail footer sections used in the five site definitions.

Working with Features

Features reduce the complexity involved in making simple site customizations, and are robust when upgrades are applied to a deployment. Features eliminate the need to copy large chunks of code to change simple functionality. Features thus reduce versioning and inconsistency issues that may arise among front-end Web servers. Features make it easier to activate or deactivate functionality in the course of a deployment, and administrators can easily transform the template or definition of a site by simply toggling a particular Feature on or off in the user interface.
Exploring the Components of a FeatureFeatures are typically stored on the SharePoint server at C:\Program Files\Common Files\Microsoft Shared\web server extensions\12\TEMPLATE\FEATURES. Each Feature has its own sub-directory that resides in this directory. Inside each Feature's sub-directory, you will find, as a minimum, a header file named feature.xml. The feature.xml file points to a manifest file that tells SharePoint where to find the code and XML that defines the Feature. The feature.xml file contains the Feature element that specifies the location of assemblies, files, dependencies, or properties that support the Feature. Optionally, the Feature element may point to an XML file that contains an Element element which defines the components and types that make up the Feature.The following are samples of the components that comprise a Feature.The Feature.xml File
The feature.xml file defines the metadata associated with a Feature.


< Feature Id="00BFEA71-E717-4E80-AA19-D0CBE412FFA6"
Title="Hello World Feature"
Description="$Resources: core,documentlibraryDesc;"
Version="1.0.0.0" Scope="Web" Hidden="FALSE"
DefaultResourceFile="documentLibrary"
ImageUrl="menuprofile.gif >
< elementmanifests >
<elementmanifest location="elements.xml" >
</elementmanifests >
</feature >

The following metadata is contained in the element in this XML file.
• ID: The GUID that uniquely identifies the Feature. This value must be unique across the server farm.
• Title: The name of the Feature. In an actual scenario, you will see the name of the Feature displayed on the Site Features web page inside the Site Settings section for a given SharePoint site.
• Description: The description of the Feature. Notice that in this sample, the description is retrieved from a resource file (a file with a .resx extension) instead of hard-coded in the file. The strings are stored as key/value pairs within the resource file. The following is a segment from a resource file named documentLibrary.resx that provides the description of the sample Feature.
• Version: The version of the Feature. This value can be incremented for successive versions of the Feature.
• Scope: Web or Site are the typical values. The scope defines the context in which the Feature can be activated or deactivated. Setting the scope equal to Web means that the Feature can be activated or deactivated within the context of the site. A setting of Site means that the Feature can be activated or deactivated within the scope of a site collection. The scope is set to the site collection displayed to the administrator in the Site Collection Features page. There are also WebApplication and Farm values.
• Hidden: TRUE or FALSE are allowable values here. This setting specifies if the Feature is visible in the list of Features on the Site Features web page. Setting the attribute to TRUE makes the Feature visible to users who want to activate it. Hidden Features must be activated either from the command line, in custom code, or through the dependency of another Feature.
• DefaultResourceFile: Specifies the central location for settings and other items that may change frequently.
• ImageUrl: Points to an image file that will be displayed next to the Feature in the user interface. element: The container element for elements.
element: Contains the location of the manifest file that contains the different elements that this Feature implements. The path to sub-directories and files is a relative path.


The Element.xml File


The Element.xml manifest file contains details of the different components or actions that make up a Feature.


< Elements xmlns="http://schemas.microsoft.com/sharepoint/" >
< Field ID="{0B9E3314-3F9F-2aa8-4BCD-7CB89A6FB32D}"
Name="ProductName"
SourceID=http://schemas.microsoft.com/sharepoint/v3 StaticName="ProductName"
Group="ProductColumns"
DisplayName="Product Name" Type="Text" >
< /field >
< /elements >

Here, the manifest file defines a field that might be used in a list column.