Saturday, June 6, 2015

Windows Server Machine: How to disable SSL v3 Protocol


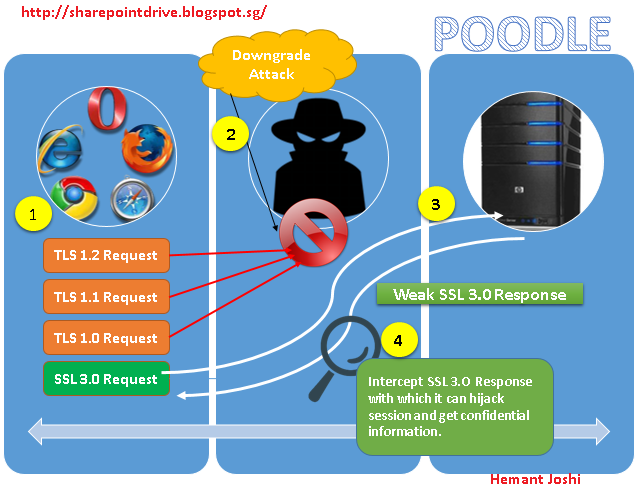
Now in the last article “Are you POODLE secure? Does your server still Supports SSL version 3” we discussed on the POODLE attack and we learned that best prevention is to disable SSL v3 and SSL v2 protocol if they are still enabled.(Note: Unless your site can work only on IE 6 or older browsers. I don’t think this will be the case for most of the sites.)

Now coming to how we disable the SSL v3 and SSL v2. (Please note we are going to make changes into the registry, and hence it is always advisable to take backup of your registry before making any changes.)

Also the steps discussed here are tested on Windows server 2008RT and should also work for windows server 2012.
  1. Open the Registry Editor and run it as administrator.
  2. For example, in Windows 2008:
    1. On the Start screen type regedit.exe.
    2. Right-click on regedit.exe and click Run as administrator.

  3. Once the Registry Editor window is open, go to the path below
    HKEY_LOCAL_MACHINE\SYSTEM\CurrentControlSet\Control\SecurityProviders\Schannel\Protocols\
Disabling SSL 2.0
  1. When you open SSL 2.0 folder you will see just one subfolder called Client we need to add new one called Server, so in the tree structure 1) Right-click on SSL 2.0 folder, and in the pop-up menu, click New > Key. 2) Name the new Key , Server
  2. Now under SSL 2.0, 1) right click on Server, and in the pop-up menu, click New > DWORD (32-bit) Value. 2) Name the value Enabled
  3. Now this disables SSL 2.0
Disabling SSL 3.0
  1. In the navigation tree, right-click on Protocols, and in the pop-up menu, click New > Key. Name the Key SSL 3.0
  2. In the navigation tree (Left Side), (Red Highlighted in pic below)
    1. Right-click on the new SSL 3.0 key that you just created, and in the pop-up menu, click New > Key.
    2. Name the Key as Client
    Repeat the same process in the navigation tree (Left Side), (Green Highlighted in pic below)
    1. Right-click on the new SSL 3.0 key that you just created, and in the pop-up menu, click New > Key.
    2. Name the Key as Server.
  3. Now under SSL 3.0, 1) right click on Client, and in the pop-up menu, click New>DWORD (32-bit) Value. 2) Name the value DisabledByDefault
  4. In the navigation tree, under SSL 3.0, select Client and then, in the right pane, double-click the DisabledByDefault DWORD value and in the Edit DWORD (32-bit) Value window, in the Value Data box change the value to 1 and then, click OK.
  5. In the navigation tree, under SSL 3.0, right-click on Server, and in the pop-up menu, click New > DWORD (32-bit) Value. 2) Name the value Enabled

Now just restart your Windows server.

You have successfully disabled the SSL 2.0 and SSL v3.0 protocol.

Thursday, June 4, 2015

Are you POODLE secure? Does your server still Supports SSL Version 3


Lately we performed a scan on an internet portal using the website: https://www.ssllabs.com/ssltest/analyze.html and must tell you the scan was eye opening and Jaw dropping. Most important SSL 3.0 was supported and because of this Poodle


POODLE stands for (Padding Oracle On Downgraded Legacy Encryption), In this by using a series of connection failures between a browser and website, an attacker can trigger what is called a “downgrade dance” where the browser eventually falls back to using the SSL 3.0 protocol to maintain communications. When this happens, the attacker can use the exploit within SSL 3.0 to grab sensitive data.


Let’s understand by the diagram above as to how it works on a high level
  1. You use your browser to access a site and provide secure details believing TLS 1.2 is there to protect and your request is passing through it.
  2. Hacker does the downgrade or fallback on the earlier. That is, even if both the server and client support more modern protocols, as long as they're willing to support SSLv3, an active attacker can force them to use this old, terrible protocol. In many cases this fallback is transparent to the user.
  3. Now the request is send through the old SSL 3.0 protocol.
  4. Server respond by using the same SSL 3.0 which because of its flaws, the response can be intercepted and then attacker can hijack sessions and confidential information

The key issue is the integrity of the padding on SSL 3.0 block ciphers. This padding is not verified by the protocol. This will allow an attacker to alter the final block of the SSL cipher if the hacker can successfully hijack the connection from an end user to the Web server.

There are a couple of caveats to the vulnerability; for the attack to work, the attacker must be on the same wireless network as you or in the path of your communications (as shown above), and your client must be running JavaScript.

This vulnerability in SSL 3.0 that can be exploited to steal certain confidential information, such as cookies. By exploiting this vulnerability, an attacker can gain access to things like passwords and cookies, enabling him to access a user’s private account data on a website.


How to stop poodle attack
I have not seen till now any way to patch SSL 3.0 against the POODLE, but still why to take risk when you can handle it by disabling SSL 3.0 altogether.

Only if you rely on older browsers like IE 6 and others which still use SSL 3.0 then you have to think else I believe disabling SSL 3.0 altogether is a way to go.

So one backup plan involves preventing the "downgrade dance" that makes the Poodle attack possible. That patch, called TLS_FALLBACK_SCSV, basically forces the browser to inform the server when it offers a weaker security protocol, as it might during a "downgrade dance" attack. That allows the server to reject the connection. Unfortunately, the TLS_FALLBACK_SCSV workaround is only effective when both browsers and servers have been patched.

Please do check the coming article on: **COMING SOON** Windows Server Machine: How to disable SSL v3 Protocol

Monday, June 1, 2015

BASICS OF CONTENT QUERY WEBPART: PART 1

CQWP has been around from ages but still I find it a most important component for any developer to rollup content over several different scopes, anywhere from a single list or library, to multiple list or libraries across an entire Site Collection.

CQWP is used for aggregating content from multiple data sources across your Web site, and then present it all in one place. On top of this you can present the information with your own custom UI by manipulating XSLT and CSS.

In this multi-part series I will be dwelling into various aspects of the CQWP

PART 1: Basics of CQWP

Part 1 : BASICS OF CONTENT QUERY WEBPART

In this part we will learn how to configure and customize the CQWP. This part is intended to the audience who have little or no experience with the CQWP.

  1. Adding CQWP to the Site
  2. Choosing Source or place from where data will be fetched.
  3. Learning the Additional Filters
  4. Presentation Section (Presenting the CQWP)
Adding CQWP to the Site

So let’s start by adding CQWP to our site.

  1. Open your SharePoint site and click the Site Actions drop-down and select Edit Page.
  2. Click on the Add a Web Part Link which open the Web part Gallery and then follow numbering to include the webpart.


  3. This will add the webpart and now to configure the webpart click “Edit the webpart” as shown

Choosing Source or place from where data will be fetched.
  1. Expand the Query Category in the Web Part Property Pane. This is basically used to choose your source and define list and content type based on that. There are three sources to choose from.
Learning the Additional Filters.

You can filter the data based on the columns/properties of the List. For E.g. I have a list “External News” with a column called “News Category” where I have category like “Political” and “Business”, now by default when I connect my list to CQWP then it will show all the items of the list as shown fig 4


So now if I want to show the “Political” news category then do as below, this will filter out the based on the “News Category” Political.


In SharePoint 2010, 2 new more advanced and dynamic way of filtering were introduced

PageFieldValue: Based on the field value present on the Page Layout, it will filter the items on the Content Query list. Let’s understand by example.
I have a Page Layout field called “Title” and based on the value of the Title I want to filter the “News Category” column of the List “External News”.
Now If I keep the page Title as “Business” and also changed the Content Query Filter as shown below then based on the page Title the data will be filtered from the List.


PageQueryString: This one I like the most. Let’s keep the same example. Define the filter as shown below [PageQueryString:] . Now using the variable name just pass the query string as shown below.
Using the query string parameter is better when you want to show different sets of results in a web part without having to make a new page for each different results set.


Presentation Section (Presenting the CQWP)
  1. Grouping and Sorting: You can select the column by which you want to group and sort the data.

    For e.g. I want to group the data based on the “News Category” column and sort based on “Created” column also u can tell whether you want to sort in Ascending or Descending order and limit the number of items to display.
  2. Styles: These define what information and how that information is displayed. I always feel styles section as a great value add to the CQWP. You can define style for the Group Style and Item Style, these styles are XSL templates, not CSS styles. You can create your own XSL templates. How to create styles will be part of the later series but just to show their power here is a small example.

    E.g. In the earlier list if I want to show the description of the title (In the list I have a column called Notes) and have the group heading as large text then this can be done as below.

Note: The “Fields to do display” section fields will change based on the “Item Style” you choose and you need to provide the column name from your list to display items.

I hope this walkthrough helps people configure and use the Content Query Web Part. Rest of the Article’s on other functionalities of the CQWP will be coming soon.

I'd be interested to hear and see examples of how people are using the web part. So, post your comments!