| How to spot the problem? |
|
1st Approach |
If your sites are displaying any of the unusual behaviors described previously, you can determine whether the cause is a memory leak due to incorrectly disposed objects by checking the ULS logs (available at C:\Program Files\Common Files\microsoft shared\Web Server Extensions\12\LOGS) for entries related to the SPRequest object.Each instance of SPSite and SPWeb contains a reference to an SPRequest object that,in turn, contains a reference to an unmanaged COM object that handles communications with the database server. Windows SharePoint Services monitors the number of SPRequest objects that exist in each specific thread and in parallel threads, and adds useful entries to the logs. For more information on this click here: |
| 2nd Approach: |
Microsoft provides a tool to help you detect and track down objects you aren’t disposing of properly called the SharePoint Dispose Checker tool. That tool is found here: http://code.msdn.microsoft.com/SPDisposeCheck |
Coding Techniques to Ensure Object Disposal |
You can employ certain coding techniques to ensure object disposal. These techniques include using the following in your code:
|
| Dispose method |
The basic idea behind using the Dispose method is you call it on an IDisposable object when you are done with it. At the point you call Dispose on the object the managed and unmanaged memory associated with the object is reclaimed. The object is also no longer usable after you call Dispose on it—any subsequent calls to the object will result in an error. Example SPSite mySite = new SPSite("http://mySite"); //do something with mysite mySite.Dispose(); //disposes of memory used by mysite //now don’t use mySite object as it will throw error |
The using Clause |
You can automatically dispose of SharePoint objects that implement the IDisposable interface by using the Microsoft Visual C# using statement. Example String str; using(SPSite oSPsite = new SPSite("http://Myserver")) { using(SPWeb oSPWeb = oSPSite.OpenWeb()) { str = oSPWeb.Title; str = oSPWeb.Url; } } It also makes your code more clear and makes it impossible for you to accidentally call into the object after it has been disposed because it also goes out of scope when you are done with it. |
The try, catch, and finally Blocks |
Using try, catch, and finally blocks obviously makes sense whenever you need to handle exceptions. Any code within a try/catch block should have a governing finally clause, which ensures that the objects that implement IDisposable are disposed. There are cases in your code where you may be creating objects that are IDisposable that may not be as obvious. For example, you may have a foreach loop that iterates over a collection that returns SPSite or SPWeb objects. For these cases you use a try, finally block in the iterator to ensure that each IDisposable object created in the foreach loop is disposed of properly. Example using (SPSite spSite = new SPSite('http://mysite/')) { foreach (SPWeb spweb in spSite.AllWebs) { try { Console.WriteLine(spweb.Name); } finally { if (spweb != null) { spweb.Dispose(); } } } } |
Friday, October 28, 2011
The Disposable Pattern in SharePoint Development
Wednesday, October 26, 2011
Sandboxed Solutions versus Farm Solutions
Sandboxed Solutions versus Farm Solutions
Why Sandbox came into Existence?
Each server in the farm can have multiple web applications running on it. A web application can in turn have one or more site collections, and a site collection has one or more sites. Farm solutions can impact the entire SharePoint system and are available to all site collections and sites in the farm. This is sometimes desirable, but sometimes can have undesired effects because a farm solution that is misbehaving can impact all sites and site collections in the system.
There are restrictions on the kinds of solutions you can build with a sandboxed solution.
Why Sandbox came into Existence?
Each server in the farm can have multiple web applications running on it. A web application can in turn have one or more site collections, and a site collection has one or more sites. Farm solutions can impact the entire SharePoint system and are available to all site collections and sites in the farm. This is sometimes desirable, but sometimes can have undesired effects because a farm solution that is misbehaving can impact all sites and site collections in the system.
- Sandboxed solutions are deployed at the site collection level rather than the farm level, so this lets you isolate a solution so it is only available to one site collection within the farm.
- Sandboxed solutions also run in a separate process from the main SharePoint IIS web application
- Process and the separate process is throttled and monitored with quotas to protect the SharePoint site from becoming unresponsive due to a misbehaving sandboxed solution.
- It is worth mentioning that sandboxed solutions solve an organizational problem as well—in many organizations it is difficult to get permission to install a farm solution because of the possible impact that could have on the SharePoint system. System administrators in charge of running a Share-Point site have been reluctant in the past to allow custom solutions to run on their sites. With the advent of SharePoint 2010, there is now a robust system in place to monitor and throttle these custom solutions so that system administrators don’t have to worry about a custom solution bringing the entire SharePoint site down.
There are restrictions on the kinds of solutions you can build with a sandboxed solution.
The most significant restrictions disallow creation of
- application pages
- visual web parts
- code-based workflows with a sandboxed solution.
Friday, June 3, 2011
Deploying A User Control In SharePoint Site
1) Create a web application called SharedUserControls.
2) Remove your web.config and default.aspx page.
3) Create a web user control called (.ascx page) in the same project and add whichever controls you want to add in this web user control.
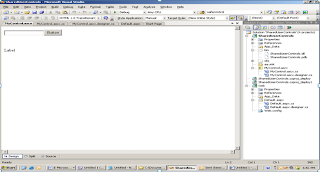
In the Source of your user control(ascx page) include the ClassName attribute, for classname, give any name with any extension. Here the classname is MyCntrl.as
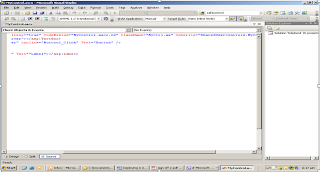
4) Here we have created a text box, a label and a button which displays the textbox text on button click in the label.
5) Add the web deployment project to the same project by selecting "Add Web Project Project..." from the Build menu. In Vsts 2008, you will need an extension for Adding Web Deployment Project. Download the same and then this option will be available inside the Build Menu.
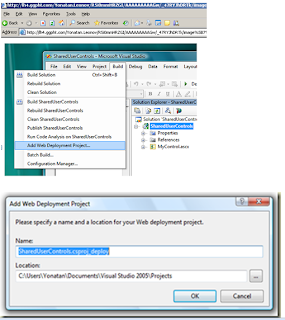
6) It will create a new web deployment project, Keep the default name as it is and click OK.
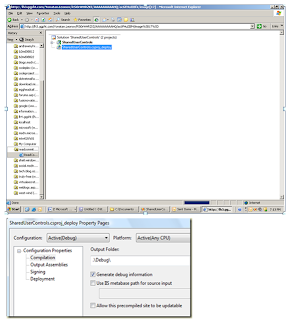
7) Double click the new project to get the project property pages.
Uncheck the last check box - "Allow this precompiled site to be updatable".
8) Go to the "Output Assemblies" tab
9) Select "Merge all pages and control outputs to a single assembly"
10) Call the assembly name: "SharedUserControlMerged”
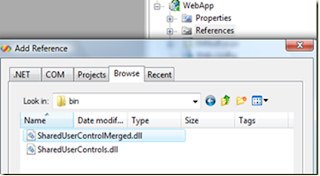
Assign strong names to both the dlls(i.e. both for the user controls(SharedUserControls.dll and the SharedUserMerged.dll)
11) Build the solution and put the SharedUserControlMerged.dll into the GAC.
12) Open the Sharepoint designer site where you want to use the User Control(aspx page)
13) Register the UserControl, by adding the code
<%@ Register tagprefix="PrintfuncLibrary" namespace="MyCtrl" assembly="SharedUserControlMerged, Version=1.0.0.0, Culture=neutral, PublicKeyToken=af7fd7f230293b2e" %>
14) Once registered, add the UserControl, in the place of your choice by adding the following code.
Next to the tag prefix , give the same extension that you gave in your user control source. Here the extension used was as.
<form id="form1" runat="server">
<?XML:NAMESPACE PREFIX = PrintfuncLibrary /><printfunclibrary:as id="SharedUserControls" runat="server"></form>
16) In the web.config of your sharepoint site, Register your assembly as a safe control. The namespace will be the same as the className in the source of your User Control(ascx page) and assembly name and Public Token Key will be that of the Merged dll that you put in the GAC.
<safecontrols>
<safecontrol allowremotedesigner="True" safe="True" typename="*" namespace="MyCtrl" assembly="SharedUserControlMerged, Version=1.0.0.0, Culture=neutral, PublicKeyToken=af7fd7f230293b2e">
17) Preview your sharepoint site in the browser, you will notice that the user control you deployed in asp.net appears in the sharepoint site.
2) Remove your web.config and default.aspx page.
3) Create a web user control called (.ascx page) in the same project and add whichever controls you want to add in this web user control.

In the Source of your user control(ascx page) include the ClassName attribute, for classname, give any name with any extension. Here the classname is MyCntrl.as

4) Here we have created a text box, a label and a button which displays the textbox text on button click in the label.
5) Add the web deployment project to the same project by selecting "Add Web Project Project..." from the Build menu. In Vsts 2008, you will need an extension for Adding Web Deployment Project. Download the same and then this option will be available inside the Build Menu.

6) It will create a new web deployment project, Keep the default name as it is and click OK.

7) Double click the new project to get the project property pages.
Uncheck the last check box - "Allow this precompiled site to be updatable".
8) Go to the "Output Assemblies" tab
9) Select "Merge all pages and control outputs to a single assembly"
10) Call the assembly name: "SharedUserControlMerged”

Assign strong names to both the dlls(i.e. both for the user controls(SharedUserControls.dll and the SharedUserMerged.dll)
11) Build the solution and put the SharedUserControlMerged.dll into the GAC.
12) Open the Sharepoint designer site where you want to use the User Control(aspx page)
13) Register the UserControl, by adding the code
<%@ Register tagprefix="PrintfuncLibrary" namespace="MyCtrl" assembly="SharedUserControlMerged, Version=1.0.0.0, Culture=neutral, PublicKeyToken=af7fd7f230293b2e" %>
14) Once registered, add the UserControl, in the place of your choice by adding the following code.
Next to the tag prefix , give the same extension that you gave in your user control source. Here the extension used was as.
<form id="form1" runat="server">
<?XML:NAMESPACE PREFIX = PrintfuncLibrary /><printfunclibrary:as id="SharedUserControls" runat="server"></form>
16) In the web.config of your sharepoint site, Register your assembly as a safe control. The namespace will be the same as the className in the source of your User Control(ascx page) and assembly name and Public Token Key will be that of the Merged dll that you put in the GAC.
<safecontrols>
<safecontrol allowremotedesigner="True" safe="True" typename="*" namespace="MyCtrl" assembly="SharedUserControlMerged, Version=1.0.0.0, Culture=neutral, PublicKeyToken=af7fd7f230293b2e">
17) Preview your sharepoint site in the browser, you will notice that the user control you deployed in asp.net appears in the sharepoint site.
Subscribe to:
Comments (Atom)


